

Pill

We know how hard your day to day is. Planning routes is a tedious job that requires a lot of concentration and experience. From Routal.com we want to help you. For this reason, we launched a series of training pills that will help you improve every day. Our goal is for you to plan better, faster and more successfully.
Shall we start?
In this pill we are going to show you how they work dynamic forms 💎
and all its potential.
Our Mission is to improve the last mile experience, for this we must achieve an ultra flexible solution capable of adapting to all types of areas. We have customers who use it for the ecommerce delivery, traditional B2B logistics, technical maintenance services, we even have several hospitals that use it for organize the visits of your medical teams at home.
Information is power.
Power comes with great responsibility
Stan Lee
Information, we always want more. We found that more and more delivery/technicians/doctors need more details of services, every second counts. In turn, each time, being able to capture more information from each of the services allows us to improve the service, to be more agile and proactive. But we only had one free text field, hitherto.
Dynamic forms allow us to have absolute flexibility when it comes to managing our data model for both customers, vehicles/routes and services. What does this mean? Well, now you can create as many custom fields as you want in these three elements.
This development will allow you to characterize with your own data what a route means, what parameters are important for your operations. In the same way, you can dynamically manage the Proof of Delivery form, to capture any important information for your business, as well as important information about the service that the delivery person may need.
Below we'll show you how it works. In the end, we will talk about some projects that we are working on based on this development that allow us to further exploit the potential of the tool.
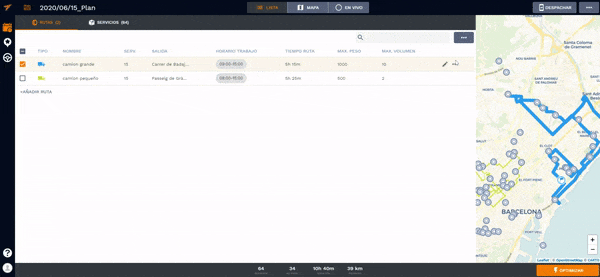
How does it work?
This functionality can be found in the configuration panel of our project. To do this, we are going to click on the project name (Square upper left corner) > Manage projects > Configure (on the desired project) > Fields (side menu)
In this menu we find a selector that allows us to select which element we want to manage (Vehicles/Routes — Customers/Services — Webapp — Service Report/Accepted/ Not Accepted)

Right now we can go to the bottom of the page and in the custom fields section we can create our field and select between different types: Text, Selector, Numeric or Multiple Selector.
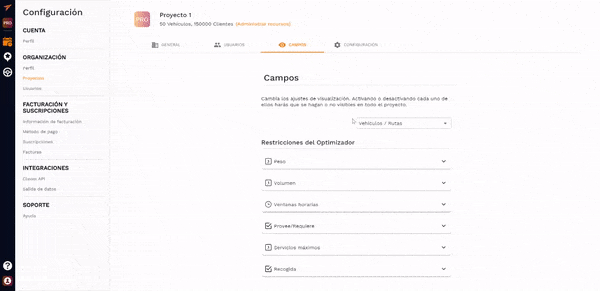
Now we simply need to define a name for the field, a unique identifier and a description. This data is what the application will use to identify the headers, internally to store the data as well as for uploading/exporting data using XLSX.
Case Study
Let's work on a practical example. Our objective will be to identify the picking location in the warehouse, define a customized type of delivery error and control the number of packages delivered to each customer.
To do this, the first thing we will do is create a custom field. We select in the drop-down menu of Customers/Services and we added a field called:
- Text type field and we're going to call it: Warehouse position
Then we will select in the drop-down menu at Accepted service:
- Numerical type field and we will call you: Packages delivered
Then in the drop-down menu at Service not accepted:
- Options type field and we're going to call it: Reasons for rejection
- We will define different options: No one at home, wrong address, Rejected by the customer and damaged shipment.
With this we will ensure that when making the delivery, you ask us how many packages we have delivered and if we cannot make the delivery, define the reason why they have not been delivered.
Now we only have to upload an XLSX file with a specific column with the positions of the services to carry out the preparation that we are going to assign to the Warehouse Position column.
Let's see the full example on video in just 4 minutes!
This advanced functionality is only available to licensed users Gorilla
or higher. This update brings many performance improvements to the application as well as usability improvements. It is no longer necessary to scroll when we reopen a route on the mobile phone 😉 among many more details.
We hope it was useful and we look forward to seeing you next week with more pills to improve your daily efficiency!

We know how hard your day to day is. Planning routes is a tedious job that requires a lot of concentration and experience. From Routal.com we want to help you. For this reason, we launched a series of training pills that will help you improve every day. Our goal is for you to plan better, faster and more successfully.
Shall we start?
In this pill we are going to teach you how to manage different PROJECTS 💎
or separate workspaces within a single account. This functionality is very useful when in your company you want to differentiate work environments, users and roles.
For example, if your company operates in different cities and you don't want to mix plans from one region to another. Another example, users who work with subcontracted/outsourced fleets and they give contractors access so they can track only their fleet. Even, a test environment, one of simulation and another one from production.
Order is a virtue, and it's proven to help you be more efficient, so we're convinced you'll like it.
A good teacher
How does it work?

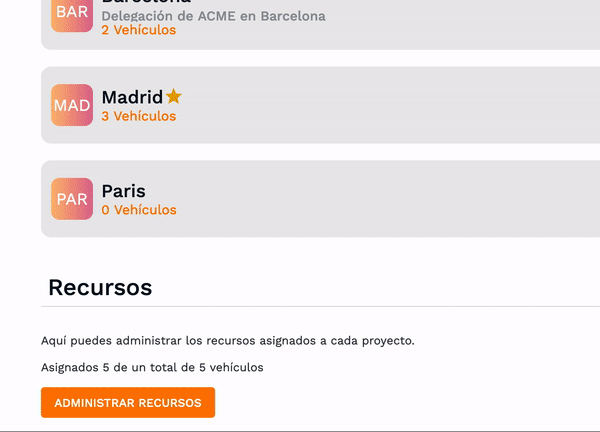
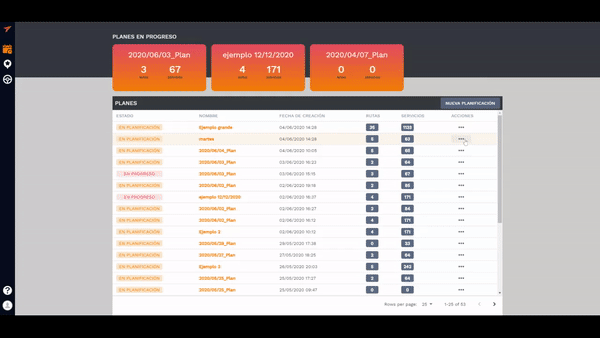
By clicking on the top left you can access all the projects, the menu to manage them and a direct access to create new ones.
When you create a new project, you can manage how many licenses you assign to each one so that you can optimize with more or fewer vehicles.
USERS 👥
At the user level, you can manage different types of profiles:
- Administrator: He is the user with visibility to work on all projects, in addition, the only one with the capacity to manage billing.
- Manager: User able to manage one or more projects, add vehicles, customers, plan and manage the entire project.
- User: This role allows you to do everything related to the product, create, edit routes, except for the project management, licensing and billing parts.
This advanced functionality is only available to licensed users Gorilla 🦍
or higher. Monkeys always run loose, but gorillas like order better 😄
I'll leave you a video explaining how it works in just 3 minutes. Enjoy it!
AND MUCH MORE... 🎉
This update brings many performance improvements to the application as well as usability improvements. We've reordered all the configuration options to make it much easier to find.
We hope it was useful and we look forward to seeing you next week with more pills to improve your daily efficiency!

We know how hard your day to day is. Planning routes is a tedious job that requires a lot of concentration and experience. From Routal.com we want to help you, that's why we launched a series of training pills to help you improve day by day. Our goal is for you to plan better, faster and more successfully.
Shall we start?
In this pill we are going to show you what each of the parameters of the example XLS means in a quick and simple way. The first thing is to list each and every one of the configuration parameters that the tool allows us.
NOMBRE DE CLIENTE	NOMBRE DE CLIENTE (obligatorio): Nombre que define el servicio
DIRECCION 1	DIRECCION 1 (obligatorio): Dirección o coordenadas del punto a visitar.
Formato de dirección recomendado: Vía nombre, número, código postal, localidad.
Formato coordenadas: Latitud, longitud.
DIRECCION 2	DIRECCION 2: (opcional) Campo de texto libre para ser usado como detalles de la dirección. Por ejemplo: «Entrada por el callejón»
HORAS DE RECEPCION	HORAS DE RECEPCION (opcional): Franjas horarias en las que se puede visitar un punto. Se pueden añadir diferentes franjas durante un día separadas por punto y coma.
Por ejemplo «8:00-9:00;11:00-12:00» significa que los vehículos pueden visitar entre las 8 y 9h de la mañana y entre las 11 y 12h.
DURACION	DURACION (opcional): El tiempo aproximado de la visita en minutos.
PESO
VOLUMEN	PESO y VOLUMEN (opcional): Las dimensiones definen unidades de reparto para este servicio. Se puede usar para diferentes unidades (litros, toneladas, palés). Estos valores se deben corresponder con las capacidades de los vehículos.
Por ejemplo un servicio puede definirse con un peso de 20Kg.
REQUISITOS	REQUISITOS (opcional): Lista de requerimientos para la parada. Si un servicio tiene un Require solo podrán parar los vehículos que tengan el mismo Provide en la lista.
Los Requires se separan por punto y coma. Por ejemplo: «beer,wine»
COMENTARIOS	COMENTARIOS (opcional): Campo de texto libre para su comunicar información relevante al repartidor.
PERSONA DE CONTACTO	PERSONA DE CONTACTO (opcional): Nombre de la persona de contacto (Texto libre)
TELEFONO	TELEFONO (opcional): Teléfono de contacto. En la App se mostrará con un link para agilizar la llamada.
ID EXTERNO	ID Externo: Identificador del cliente o identificador único del servicio.
E-MAIL	EMAIL (opcional): Email de contacto.
PAGINA WEB	PAGINA WEB (opcional): Página web del contacto.
I'll leave you an excel file as a template so you can save it as a reference and a cutlet (Cheatsheet).
We hope it was useful and we look forward to seeing you next week with more pills to improve your daily efficiency!

We know how hard your day to day is. Planning routes is a tedious job that requires a lot of concentration and experience. From Routal.com we want to help you, that's why we launched a series of training pills to help you improve day by day. Our goal is for you to plan better, faster and more successfully.
Shall we start?
In this pill we are going to teach you How to start with the last mile distribution in the middle of COVID-19 and not die trying. In short, we'll teach you how to design a distribution unit step by step for a small company that wants to start distributing its products at home. (This article is a quick summary of the video you'll find at the end.)

This is the first question we must ask ourselves. Since everything will be developed based on this objective. So we have to be ambitious, but maybe then we have to review this premise and see if it's economically viable or simply doesn't make sense.

In this case we are going to design a next-day delivery experience. A lot of questions will arise, which we will try to answer little by little.

The first thing we have to do is not want to create a rocket that goes to the moon. For this purpose, the LEAN methodology continuous improvement must help us to design the first operation in a simple and, above all, FAST way. That is the objective, to come up with something that works “more or less” and to learn from it. Because no matter how much we think about it, until we start it, we are not going to really learn how the market will behave. Mike Tyson has a very famous quote: “Everyone has a plan, until I punch them in the face.” Let the market hit you in the face and be able to avoid problems as they appear.
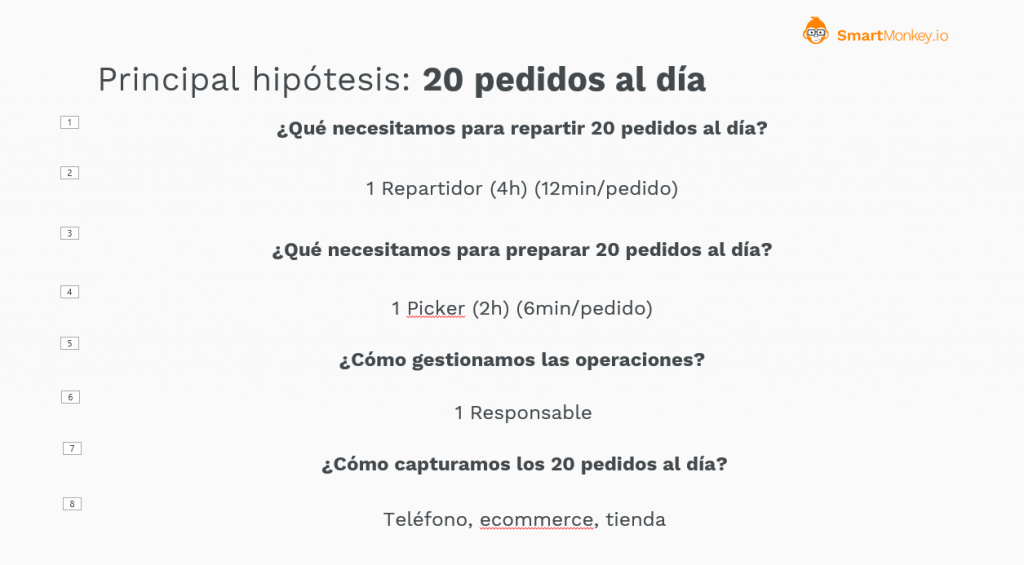
The main hypothesis that we are going to assume is the number of shipments that we are going to have to make. This data will determine the rest of the exercise, so we have to imagine this data with the utmost precision. The problem is that it is very difficult to specify without experience and in the middle of a situation as abnormal as the current situation may be. So with 99.9% security, we'll be wrong, but this is where we have to be flexible enough to know how far we have to go and correct with the maximum possible speed.
The rest of the questions are necessary deductions based on the premise. How many delivery people do we need to deliver 20 orders in one day? , How are we going to prepare 20 orders a day? , Who is going to manage this new business? , How do we get all 20 orders a day? For me, this last question is the basis of everything, because without customers the rest doesn't make sense. Therefore, it is very important to know how these customers are going to be obtained. Faced with an avalanche of customers, have enough strength to say no and not compromise the experience of others. There are PREMIUM products that use this strategy to value your product or service more. So if you say no, it can be your greatest ally.
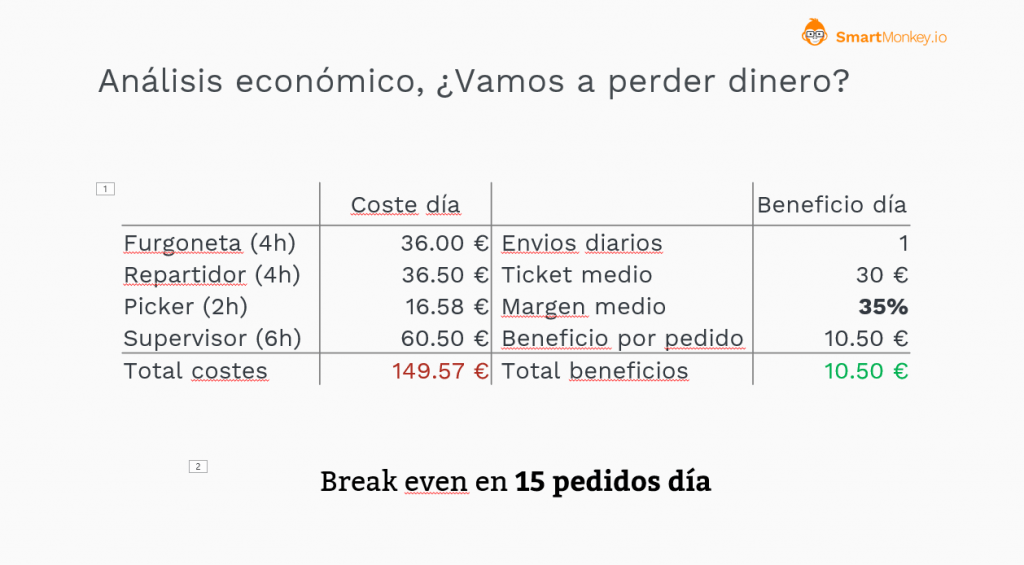
Right now we have to begin to analyze at an economic level what the estimated costs of launching a new business unit in the company are going to be. In this example, we have assumed a market price in Spain for both the costs and the average profit of a fruit and vegetable store. The important conclusion is that in order not to lose money on this new unit, we must be able to sell at least 15 orders a day. That is our minimum objective. So scaling the company to fulfill 20 orders seems reasonable.
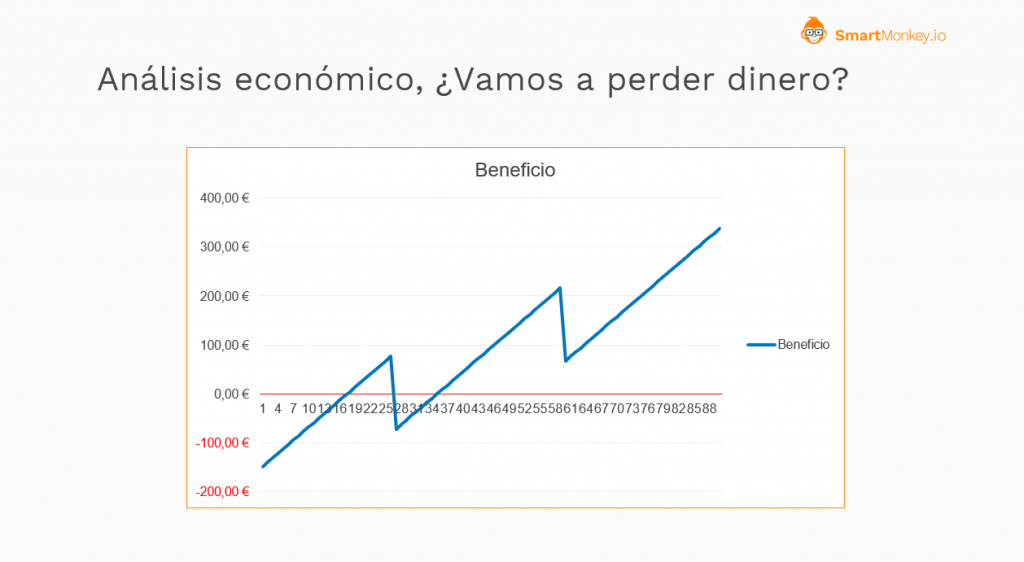
Right now we have to analyze the evolution of costs based on the number of deliveries. We can see how the analysis suggests that if we make less than 15 deliveries a day we will lose money. The analysis tries to represent that at a level of orders it is necessary to hire more staff, so one more delivery generates losses due to this need for service. This aspect is important, but as always there is a certain amount of flexibility in this area that must be addressed particularly in each case. Just as not everyone performs the same, plans are those plans, but they give us a rough idea of how reality will behave.
In the following link you can download the excel with which we designed this graph so that you can play with the model, and see how it behaves. Remember that maybe your average ticket is different, or your operating margin per sale is higher, review it and see how it affects your profitability.
Ask us in the chat and we will send it to you immediately
From now on, we will evaluate if our home delivery business can generate profits and how many it will generate.

Let's get to work, now we have a plan, now all that remains is to execute it. First we'll need a system that allows us to capture orders, and that can be something as simple as a notebook and pen, a WhatsApp message, the phone or an online store. There are many solutions on the market such as Shopify, 20 Bananas, or Hikeup among hundreds or thousands of other solutions.
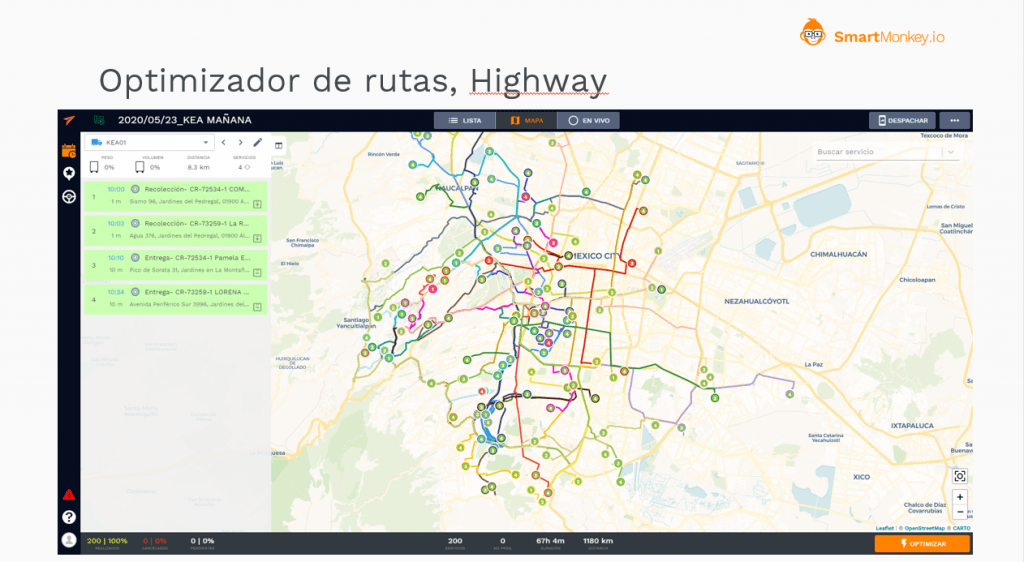
The next step is to organize the cast, and this is where Routal.com can help you organize daily routes in a simple, fast and efficient way. In the full video you'll see a small demonstration, but if not I'll leave you a few other videos (YouTube) where you can see more details.
Ace of the market
The benefits of using a route optimization tool like Highway are many. For example, the improvement of productivity by more than 27%, the reduction of problems and delays in deliveries (96% success), detecting in real time when problems arise and being able to respond to customers. As well as a reduction in CO2 emissions by more than 30%. All of this on a platform where it will take you less than 30 minutes to master.

In short, this entire article is aimed at improving the delivery experience. It's our vision as a company. Be part of this experience by offering the best tools so that every day we can enjoy better service and make it more efficient. For our customers, the environment and the rest of the inhabitants of our cities.

We hope it was useful and we look forward to seeing you next week with more pills to improve your daily efficiency!

We know how hard your day to day is. Planning routes is a tedious job that requires a lot of concentration and experience. From Routal.com we want to help you, that's why we launched a series of training pills to help you improve day by day. Our goal is for you to plan better, faster and more successfully.
Shall we start?
In this pill we are going to teach you How to make routes so that your trucks have to return to the warehouse to load more merchandise. To do this, we will use the Pick-up & Delivery concept. You'll see that in less than 4 minutes you will know how to use it and get the most out of it.
The concept Pick-up & Delivery It corresponds to the fact that a service must first be picked up in one place and then delivered to another by the same vehicle. If the service has a capacity associated with it (Weight or volume) it will consume this load when picked up (Pick-up) and once it is delivered it will be released (Delivery) leaving free space in the vehicle.
On our route, the Pick-Up is marked with the (+) cargo symbol and the delivery with a (-).
In the following video I show you the process of defining pick-up and delivery in less than 4 minutes.
If we want to squeeze even more out of this functionality, we can define some services without pick-up, which for the system would be like customers who must leave loaded at the beginning of the warehouse, and only define the pick-up for those who cargo may be available at a time farther away from the truck's departure.
It can also be used to manage the reverse logistics, I need to load merchandise from a customer who must return to the warehouse. To do this, I first need to empty the truck and have enough space. It's as simple as defining a pick-up location (Customer) and a delivery, in this case the warehouse.
Microwarehouses in big cities. In this configuration, we have merchandise that leaves a central warehouse on the outskirts of the city, and small warehouses distributed around the city center. The system will try to load as much as possible from the central warehouse and, as space becomes available, it will be able to load merchandise from the microwarehouses to continue distribution.
Personal mobility. When we have to pick up several people at different points and we have to take them to different places. Each person will be a pickup point (Pick-up) and their destination will be Delivery. In this way, we simply have to define a capacity variable as the number of seats available and the optimizer itself will decide the best route for collecting and delivering passengers.
These have been some examples of how to use this functionality to get the most out of completely different scenarios. In the next pill we will delve into these cases and give more examples.
We hope it was useful and we look forward to seeing you next week with more pills to improve your daily efficiency!
We know how hard your day to day is. Planning routes is a tedious job that requires a lot of concentration and experience. From Routal.com we want to help you, that's why we launched a series of training pills to help you improve day by day. Our goal is for you to plan better, faster and more successfully.
Shall we start?
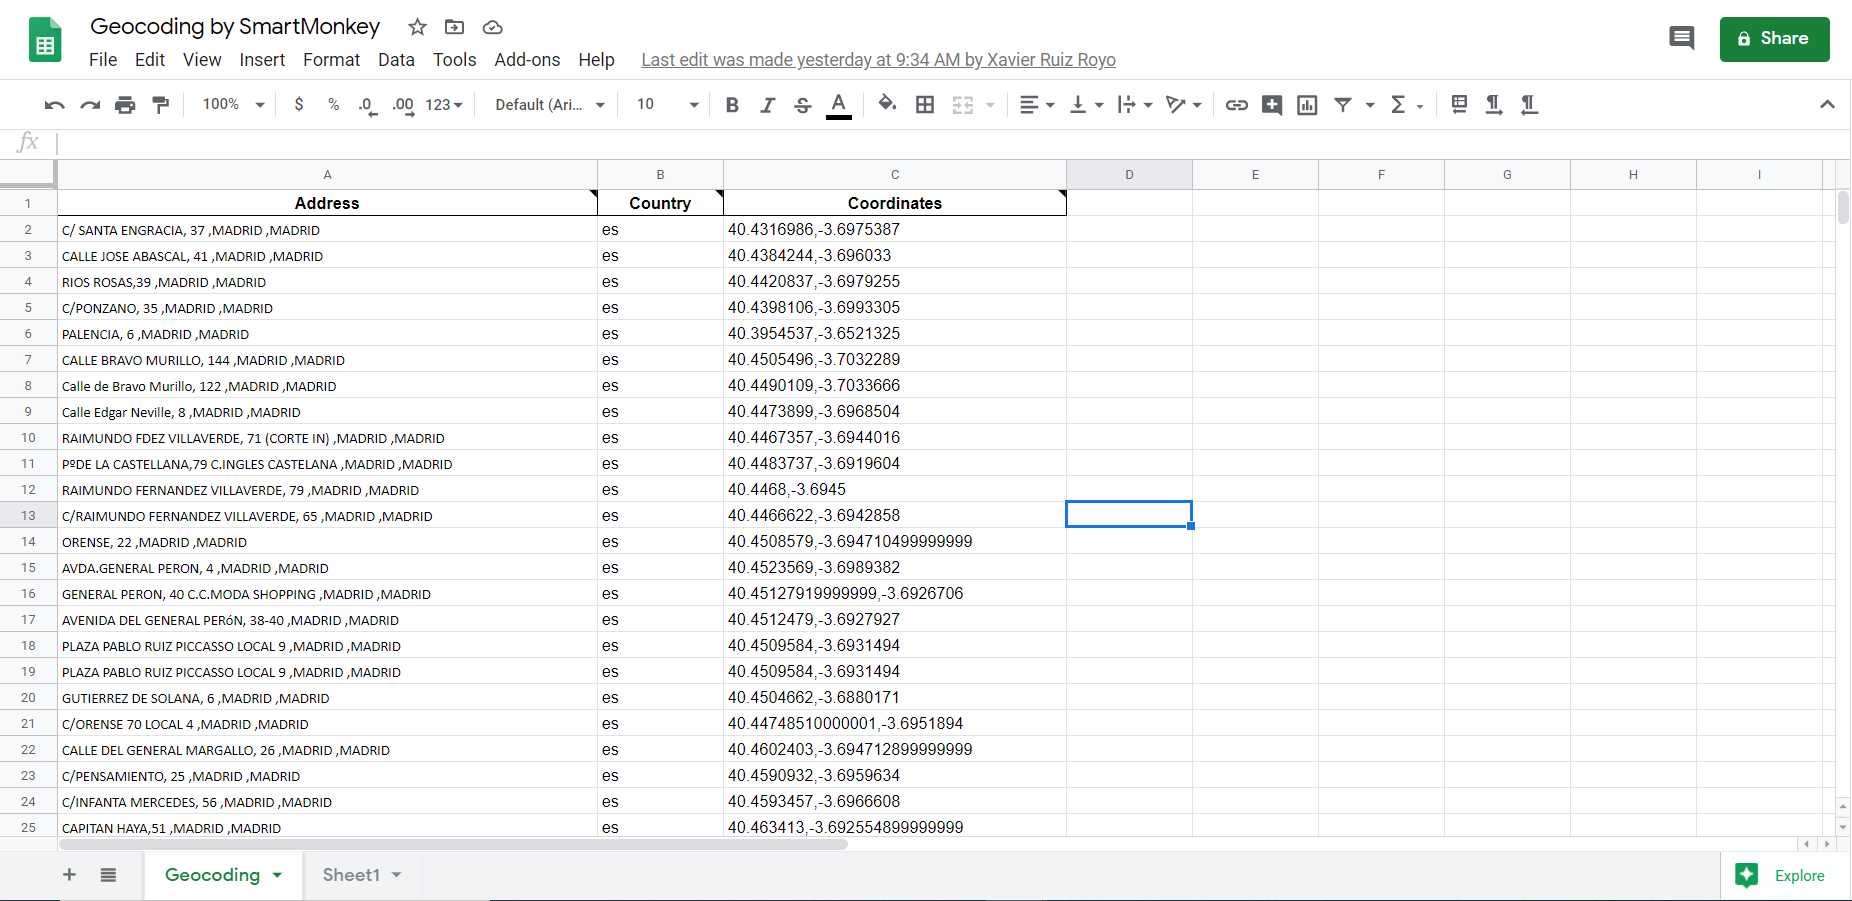
In this pill we are going to teach you How to geolocate addresses of your customers through the map provider Google Maps. To this end, we have developed a add-on for Google Spreadsheet with which you can geolocate up to 3,500 addresses daily in an easy and fast way.
In previous pills we were seeing how to improve the quality of the results (Ep. 3 Address Geocoding) and how to extract coordinates from Google Maps to be able to include them in any service on the platform. Today we will see how extract addresses in bulk to be able to improve the data quality of our service file.
The first thing is to have a free account of Gmail. Once we have the account, we can access to create a new document of Google Sheets. Once we create a new document, we simply have to go to Add-ons > Download Add-ons and in the search engine put: Geocoding by SmartMonkey. The next step is simply to install the add-on and give it the necessary permissions.
With this small process, we will have installed the add-on that we can use very easily and quickly. Let's see how to use it.
The first time we install the plugin, it will create a new page in our document called Geocoding. If we wanted to create this template in any other document, we just have to go to the Spreadsheets options, Add-ons > Geocoding by SmartMonkey > Create Template.
At this point we will have the template created. You will simply have to Fill in the addresses that you want to geolocate in column A (Address) and specify the country. You'll have to follow the naming of domains. Here are some examples:
Spain: es
Mexico: mx
Argentina: ar
Chile: cl
Colombia: co
United States: us
The next step is to geolocate. To do this, we have to click on the menu of Add-ons > Geocode by SmartMonkey > Geocode. In a few seconds, the result will appear in column C with which we can simply copy and paste it into our Excel file to be used in Highway.
In the following video I show you what the entire process is like, from installation to use on Highway.
We hope it was useful and we look forward to seeing you next week with more pills to improve your daily efficiency!

We know how hard your day to day is. Planning routes is a tedious job that requires a lot of concentration and experience. From Smartmonkey.io we want to help you, that's why we launched a series of training pills to help you improve day by day. Our goal is for you to plan better, faster and more successfully.
Shall we start?
In this pill we are going to teach you how to monitor schedules in a simpler way. You'll be in control at all times and we're going to let the optimizer do what you want it to do.
Who better than me knows how to do my job?
Anonymous route manager
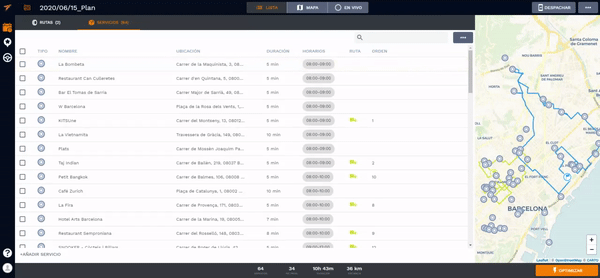
We will work on the assumption that the company segments its routes by zip codes. As we saw in the Pill 2, we can create zones using the Prove/Requires restriction, but today we're going to do it differently. A little more manual, but very effective when maintaining those areas can be somewhat complicated.
What we are going to do is select groups of services and assign them to a route easily and quickly. Then we'll let the optimizer finish adjusting the order.
The process:
- Upload the file with the addresses
- Filter by zip code
- Assign to the corresponding route
- Optimize that particular route
- Monitor the route
- Block the route
- Repeat step 2 until all services are finished
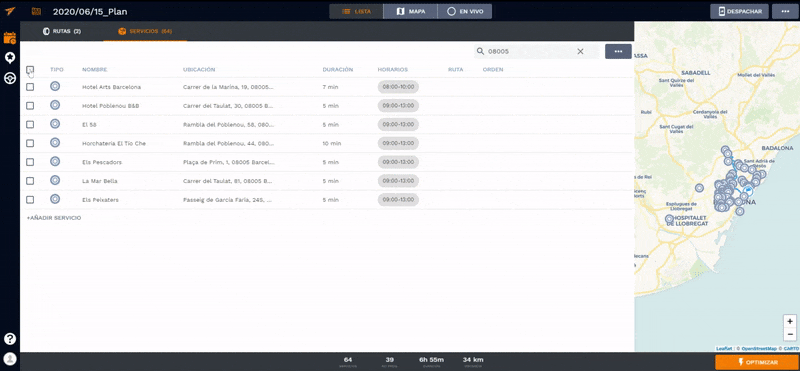
How do we filter services?
Simply in the services section, in the upper right part of the search engine, we filter by the zip code and the system will automatically filter the services with that code. The system searches inside the name of the service and its addresses.
Stunt: You can add more information to the name of the service to allow you to search more quickly for groups of services that don't necessarily share a zip code.
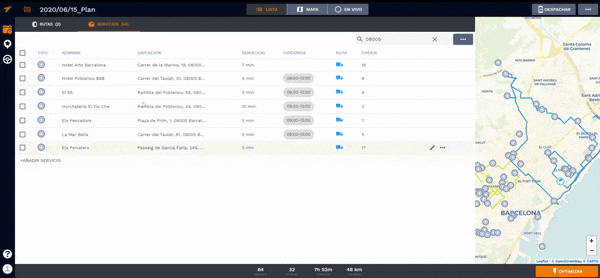
Assign a service group to a route
Once we have filtered the services we want, we simply have to select those we want and assign them to the route we want.
Optimize a specific route
To simply return to the routes tab and press the right button or on the three points of the route that we want to optimize. Click on the Reoptimize route option and the optimizer will only plan this specific route.
Important: The optimizer can leave out a service for several reasons: Lack of time, capacity limit, etc. Once optimized, you can monitor the route and edit it to your liking, bypassing some restrictions if necessary.
Block a route
Once we have a route to our liking, remember on the map screen we can make whatever manual edits we want, we can block it so that the planner does not modify it. This option will prevent neither the services nor their order from being affected by new planning.
We can use this to our advantage, using the optimizer so that it allows us to gain efficiency until we have all the services assigned.
Now all that remains is to repeat this process until all the services to be planned are finished.
Demonstration of the entire process
In the following video we show you this process with a real example:
We hope it was useful and we look forward to seeing you next week with more pills to improve your daily efficiency!

We know how hard your day to day is. Planning routes is a tedious job that requires a lot of concentration and experience. From Routal.com we want to help you, that's why we launched a series of training pills to help you improve day by day. Our goal is for you to plan better, faster and more successfully.
Shall we start?
In this pill we are going to teach you how to be able to plan for the long term, or in other words, to be able to plan an entire week of work easily and quickly. Thanks to our latest functionality Make a Copy, you can copy those services from a schedule that, for example, have not been assigned. Among some other options that we will be teaching in future episodes.
How do we copy a plan?
This is the quick process to copy a plan, on the main plan screen, we click on the 3 dots (plan options) and there we click on Copy the plan. Then a message will appear in which we must choose which services we want to copy.
How do we plan for the long term?
Now that we know how to copy a plan, the process for creating a multi-day schedule is as follows:
- We created a schedule with all the services for a week and changed the title (Monday)
- We optimize with the routes available for the first day
- Because there may not be enough time to perform all of the services, some will remain in the Unassigned status.
- Copy the plan with a new plan name (Tuesday) and we only select the unassigned services.
- We have optimized this new plan and again, some services will be left unassigned.
- We repeat the copying process until we end up with a schedule in which there are no unassigned services.
In the following video we show you this process with a real example:
We hope it was useful and we look forward to seeing you next week with more pills to improve your daily efficiency!

We know how hard your day to day is. Planning routes is a tedious job that requires a lot of concentration and experience. From Smartmonkey.io we want to help you, that's why we launched a series of training pills to help you improve day by day. Our goal is for you to plan better, faster and more successfully.
Shall we start?
In this pill we are going to show you how one of our customers uses Highway. The before and the after. But the most interesting thing is the impact it is having on its logistics thanks to the use of route optimization technology. I'll give you a heads-up, they've succeeded reduce logistics costs by 21%, improve the Deliveries on time and go from 83% to a +95% and increase productivity of the routes in a +27%, among other benefits.
This is the webinar we did together with the ICIL Foundation where we present the success story of Canasta Rosa. It's a bit long (16 min), but I encourage you to see it all worth it 😉
00:00 Smartmonkey.io presentation
09:00 Success Story by Canasta Rosa
14:43 Pink Basket Results
18:54 Highway platform demonstration
25:00 Attendee Questions
If you have questions, don't hesitate to send us an email or ask us through our chat, our service is what makes us different, so don't hesitate to ask us!
We hope it was useful and we look forward to seeing you next week with more pills to improve your daily efficiency!
Move the world smarter


.png)


