

Training pills — Ep 15. — Custom fields and dynamic forms

We know how hard your day to day is. Planning routes is a tedious job that requires a lot of concentration and experience. From Routal.com we want to help you. For this reason, we launched a series of training pills that will help you improve every day. Our goal is for you to plan better, faster and more successfully.
Shall we start?
In this pill we are going to show you how they work dynamic forms 💎
and all its potential.
Our Mission is to improve the last mile experience, for this we must achieve an ultra flexible solution capable of adapting to all types of areas. We have customers who use it for the ecommerce delivery, traditional B2B logistics, technical maintenance services, we even have several hospitals that use it for organize the visits of your medical teams at home.
Information is power.
Power comes with great responsibility
Stan Lee
Information, we always want more. We found that more and more delivery/technicians/doctors need more details of services, every second counts. In turn, each time, being able to capture more information from each of the services allows us to improve the service, to be more agile and proactive. But we only had one free text field, hitherto.
Dynamic forms allow us to have absolute flexibility when it comes to managing our data model for both customers, vehicles/routes and services. What does this mean? Well, now you can create as many custom fields as you want in these three elements.
This development will allow you to characterize with your own data what a route means, what parameters are important for your operations. In the same way, you can dynamically manage the Proof of Delivery form, to capture any important information for your business, as well as important information about the service that the delivery person may need.
Below we'll show you how it works. In the end, we will talk about some projects that we are working on based on this development that allow us to further exploit the potential of the tool.
How does it work?
This functionality can be found in the configuration panel of our project. To do this, we are going to click on the project name (Square upper left corner) > Manage projects > Configure (on the desired project) > Fields (side menu)
In this menu we find a selector that allows us to select which element we want to manage (Vehicles/Routes — Customers/Services — Webapp — Service Report/Accepted/ Not Accepted)

Right now we can go to the bottom of the page and in the custom fields section we can create our field and select between different types: Text, Selector, Numeric or Multiple Selector.
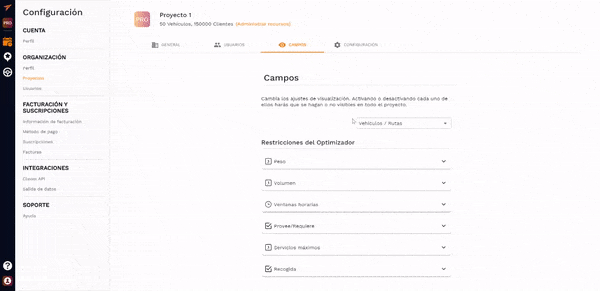
Now we simply need to define a name for the field, a unique identifier and a description. This data is what the application will use to identify the headers, internally to store the data as well as for uploading/exporting data using XLSX.
Case Study
Let's work on a practical example. Our objective will be to identify the picking location in the warehouse, define a customized type of delivery error and control the number of packages delivered to each customer.
To do this, the first thing we will do is create a custom field. We select in the drop-down menu of Customers/Services and we added a field called:
- Text type field and we're going to call it: Warehouse position
Then we will select in the drop-down menu at Accepted service:
- Numerical type field and we will call you: Packages delivered
Then in the drop-down menu at Service not accepted:
- Options type field and we're going to call it: Reasons for rejection
- We will define different options: No one at home, wrong address, Rejected by the customer and damaged shipment.
With this we will ensure that when making the delivery, you ask us how many packages we have delivered and if we cannot make the delivery, define the reason why they have not been delivered.
Now we only have to upload an XLSX file with a specific column with the positions of the services to carry out the preparation that we are going to assign to the Warehouse Position column.
Let's see the full example on video in just 4 minutes!
This advanced functionality is only available to licensed users Gorilla
or higher. This update brings many performance improvements to the application as well as usability improvements. It is no longer necessary to scroll when we reopen a route on the mobile phone 😉 among many more details.
We hope it was useful and we look forward to seeing you next week with more pills to improve your daily efficiency!
Related tags:
Read more articles:
%20(37).webp)
%20(36).webp)
%20(35).webp)
%20(34).webp)
Move the world smarter


.png)


